Showing posts with label project. Show all posts

Tuesday, 2 February 2016

Winterly springlike moodboard

My mind is currently somewhere between winter and spring and I can't really decide which one I'd like more. Actually, it's still supposed to be winter here in Germany (and I wouldn't mind to go skiing again) but there have been some pretty nice days last week and the weather is very mild. So no wonder I'm getting springvibes and am already looking out for some "springspiration"...

So this moodboard combines some leftovers of the cool winterly colors mixed up with some colorful spring tones that are soon to come. There is soft and cosy wool in contrast to fine floating materials. There is healthy comfort food in contrast to nature on the first springlike days. And everything is underlined by one of my current favorite songs.


COLOR GRADIENT YARN 
This yarn shows the play with cool and warm colors as I described before. It should be great for a spring garment or a light shawl and you need only one ball for one garment

CARROT BANANA BREAKFAST BAKES
I've been wanting to try out new breakfast ideas for a while. I mostly grab breakfast on the go and was looking for some healthy options. I made this as muffins and quite like them so far (still trying).

ONLINE YARNS LINIE 4 in petrol
I'm using this wool for a current knitting project. It's going to be a really nice sweater and I suppose it's not only for winter but also for cool spring days and I really love this color.

A SUNNY WALK
I took this walk last week where I got to enjoy a lot of sun even though it's only January. This picture was taken just near my neighborhood, but somehow it looks a bit Mediterranean and reminds me of last spring's trip to Mallorca.

COLORFUL BALL GOWNS
I've seen these dresses on TV at the Semperopernball worn by 90 girls (and boys in dark suites) dancing. It looked amazing and those fresh colors just inspired me. They look so flowery and playful and yet so classic.

TULIPS DECORATION
Perfectly matching with the dresses, I love this tulip decoration. Tulips are happy flowers for me and they come in so many colors. I might try this decoration in spring (taking them out of the soil and putting them into water like described here).

FIRST AID KIT - HARD BELIEVER
I recently discovered their first album for myself (as I got it for Christmas) and have to say I quite like it. This song just expresses some feelings I've got inside me these days.
(It's the link for the German Amazon download so just google it if you're from somewhere else.)

So I hope you like my very first moodboard - it was about time since I've had all these things in my mind. What about you? Do you know this feeling somewhere in between winter and spring? Do you like this time of the year?
Love, Kerstine.

Wednesday, 17 June 2015

Crochet Minion Phone Case


This is just another small fun project I want to share. You can crochet it in just one day or even one evening if you're a fast crocheter. Even for beginners it's quite easy because it's crocheted in rounds and there are not many different stitches necessary.
I made this phone case for a friend who is a fan of minions and I think he really liked it. 
The free pattern I used is from Tampa Bay Crochet. I particularly like the eye being used as button to close the case and prevent the phone from sliding out. I had to modify the size of the case a bit though because my phone case was made for a Samsung S3 Mini which is a bit smaller than the given measures. That's why I made a gauge before I started on the case and decided to use a smaller crochet hook (4mm). It worked out perfectly.


I think this phone case is a great gift idea as it is quickly made and  you could easily use different colours or a different design (e. g. stripes) if you or the gifted person isn't into minions that much. I used this stripy design when I made another one for my mum.


What do you think about this phone case? Which colours and pattern would you prefer?

Sunday, 5 April 2015

Happy Easter!

So... happy Easter everyone! I've spent the last days doing quite a few fun things. Easter didn't come with spring weather though, well there was some sun but it's definitely too cold for spring. However I made the days colorful and cheerful by several activities. 

Painting Easter eggs is a thing I haven't done in years, I used to love it as a child. I don't know if you have this tradition in other countries but in Germany you empty the eggs by blowing out the edible stuff through little holes then clean the eggs and they're ready to get painted.
I used acrylic paint and just painted a few nice patterns that came to my mind. Here's my work in progress... 
 The green one is a flowery spring pattern, then there's the 'maritime' egg in red and blue with random white dots and the geometrical one with triangles all over.I hate wating for the colours to dry, but all in all it was really fun to do this plus they turned out very decorative.

So much of painting Easter eggs. But I've also coloured boiled eggs for us to eat. We use a special food colouring to do this and as the eggs are boiled you can keep them quite a while and have one or two (or more) each day for breakfast or as a snack.
We also spent some time outside despite the cold weather, there was some sun at least. We went for a long walk doing some Geocaching. For those of you who haven't tried - it's really fun!

Are you having nice Easter celebrations? Do you know the traditions of painting and colouring eggs? Which one of my eggs do you like best? Love, Kerstine.

Thursday, 12 February 2015

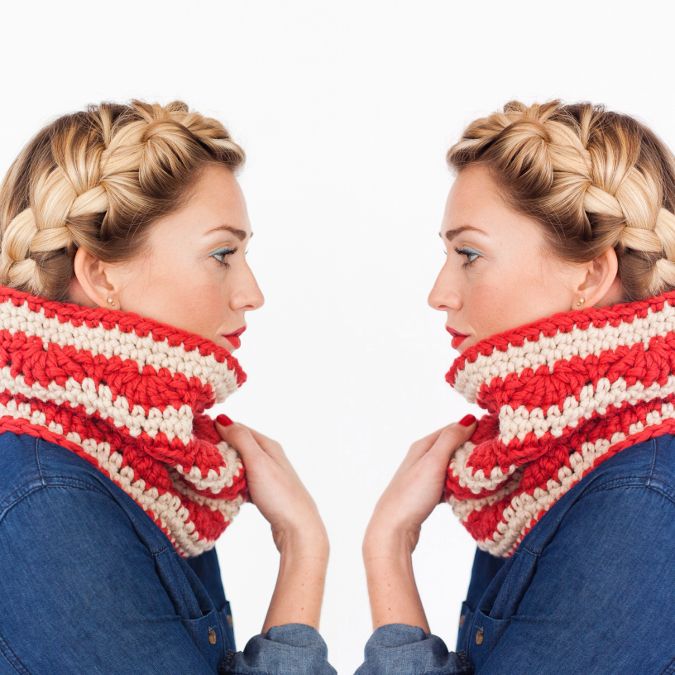
Project #17: Scallop Stripe Cowl

Hi there, it's finally time for a new project. The first one this year. I've got several projects in my head or on the go right now but last weekend I was really inspired by this cowl. The pattern is from a crochet book I got for christmas (and which I badly wished for): Crochet with One Sheepish Girl by Meredith Crawford. I've been following Meredith's blog for a while now and I like her modern design projects. It's important to me that things I crochet don't look like they're only worn by grandmas and in my opinion she really does the magic.


So this is her Scallop Stripe Cowl (the photo is from Meredith's book). I chose different colours because I wanted to use some of my yarn stash (see my goals for 2015). I found some skeins of "Rödel Polar" in my stash which is a super bulky yarn for hook size 9 to 10 mm. 

I also think that this combination of dark blue and sunny yellow comes out really nice. It reminds me of the sea and the beach in summer holidays which combines well with the scallop stripes. I've also seen it named as shell stitch. 

The cowl is pretty easy to make if you have just a little experience with crochet (and if you don't you can learn it from Meredith's great book) plus I think it was quite fast to crochet as you' re using super bulky yarn. Despite the instructions in the book I did only 2 repetitions of the pattern as it was big enough for me as the yarn causes to cowl to stand up (and not to slip down as many cowls do). 
So all in all it's a great garment to wear now as it's still winter in Germany and I sometimes need a little reminder of summer. But don't get me wrong - I like snow - but all in good time!


Sunday, 9 November 2014

Project #16: Coin Bracelet

A few weeks ago I put an idea into action that I've been having in my head for months. This is what I'm showing you today. You may already know about my love of Norway and as I happen to be there several times a year, I've always got some Norwegian crowns lying around waiting to be spent during my next visit. 
I like their design a lot, especially the ones with holes in the middle have always been pretty for me.
So I came up with the idea to use a one-crown-coin for a bracelet. This way I can always carry a memory of the country and our great holidays there with me. It's a special souvenir.

The method I used for the bracelet is nothing special but I have never tried it before, so it was new to me. I used a blue cotton thread from my local craft store and the (very good) instructions from the blog Tippy & Tassel. I tied a clasp to the ends and fixed the ends with clear nail polish to prevent them from opening up.
You could surely use different coins, e. g. the five-crowns-coin which is bigger (see the photos), or even a small key and any robust thread. However, I like my new bracelet a lot and I think this would also make a great gift. Which coin or object would you use for a bracelet? Love, Kerstine.


Friday, 5 September 2014

Projects #14 & 15: Crochet Owl Rattle and Baby Slippers


A few weeks ago I crocheted a baby rattle and some tiny slippers for a friend's new born girl. So here's how they turned out. I found the owl pattern on pinterest and immediately wanted to make it. It can be purchased from Tamara Gaal on Ravelry. I already know that I'll make more of those when there are more babies. It's sooo cute! You need many different yarn colours and a rattle ball which I ordered on the internet.
It was quite easy to make, the only boring thing was sewing all the different parts together in the end. But I can live with that if it turns out to be so cool.

The other present I made were a pair of really nice slippers. I used this pattern but you have to be a little creative here as this is only the pattern for the right shoe (the left one naturally has to be a bit different). For the flower, I just figured something out myself. You find a lot of patterns for flowers on the internet, the ladybird is just a crocheted circle with four red stitches plus two black stitches and embroidered dots. I really enjoyed making these things. Love, Kerstine


Wednesday, 13 August 2014

Project #13: Knitted Cactus

Finally here's a new project. I know, I haven't posted much lately because I just had a lot of things going on - work (you know what I mean) and also private things. I also went on a 10-day-vacation to Southern Norway with my husband (more about that coming in a post soon, I promise).

This is one of my latest project - a knitted cactus. I think, it looks really great!

I got the idea and the pattern for this cactus from the German knitting magazine "Simply Stricken". It's really easy to make and I got to use some of my leftover wool, which is great as I never know what to do with it. 
You just knit a little tube (preferably a rib pattern) from nice yarn (I used both a simple acrylic yarn and a mohair yarn at the same time) and at the end pull it together and fill it with filling material. You can add a little flower if you like. I then glued it into the little flower pot (which I bought at my local craft shop) and put the pins in.
Now it can be used as pin cushion. So it isn't just a nice decoration but can actually come in useful. I'm gonna have to make another one for myself though because I gave this one to a friend for her birthday.
What do you think of my cactus? Have you ever knitted any plants? Love, Kerstine

Wednesday, 4 June 2014

Project #12: Felted something case


It took me quite a while to publish a new project – sorry. I've got several projects going but didn't get to finish any until some days ago.

So... here's my new project. Initially I wanted to make an ipad case but as this is the first time I used wool you can felt in the washing machine I somehow miscalculated the size (you have to knit it 40% bigger than it's supposed to be after felting). So I got the width right but it's far too short to cover the ipad in whole length. Such things happen, not everything is working out as planned...
However I still like it very much, the colours and the texture are really great. So I'm going to use it for something else – maybe as a book case or just a little bag... AND I'm planning on making another one which fits properly... See ya soon!

Friday, 9 May 2014

Project #11: Crochet Slippers


This is my new project! A pair of Mary Jane slippers that I crocheted last weekend. It's a present for my mum because it's mother's day on sunday. I was searching for a small knit or crochet project and found these on the internet. It' s a very good free pattern from GoodKnits. I replaced the buttons with little bows though.

I chose green again because it makes me feel like spring and is typical for May (in my mind).
When I finished them, they looked like on this picture and they seemed quite small but they stretch when I put them on. And they look really great!
I also put some sock stop on like I described in this post to avoid slipping on plain surfaces. So I hope my mum will like them. See you soon... Kerstine :)

Monday, 28 April 2014

Project #10: Crochet Infinity Scarf

Here's my 10th project - yay! I've been working on this scarf for some weeks because I didn't have much time with Easter and everything else. Now it's finally finished and I think it's just right for spring - not too warm but perfect for a chilly spring day. I got this pretty easy pattern from Bits & Bobbles (nice blog btw). However I twisted the scarf once before sewing it together so I got a moebius scarf.
I also love the colour which is springlike to me. Now I just have to find clothes in my wardrobe to combine it with (haha).
See you...

Wednesday, 16 April 2014

Project #9: Bunny egg cosy crochet tutorial

As it is already Easter this week, I figured I shouldn't hold this back - in case you're still looking for presents. I came across bunny egg cosies quite often during the last weeks to but never really found a tutorial that matched with my yarn and my idea of how it should look like. So I made up my own bunny cosy pattern (especially the ears are different from other patterns).
 And I'm sharing it with you as my first "real" tutorial, yay!

I used a leight weight cotton crochet yarn and a crochet hook size 4mm (Europe) which means you need size 6 in the US and size 8 (4ply) in the UK as far as I can trust my needle size converter. I used green yarn here because I think it's better to see on the photos (I've already made a brown bunny too). 
Besides you need a tapestry needle and – if you want to give your bunny a face – some embroidery thread (in the colour you like).


Start with a magic ring which I do as shown in the pictures. 

Hold the yarn like you see in the left picture. Then put the hook through the loop on your thumb, gather the thread between your thumb and index finger and pull it through the loop. Gather the yarn a second time and chain one. Now you should have a loop with one chain stitch as you can see in the picture below. (Of course you can use every other way you know to create a magic ring).


1st round: Single crochet 4 into the ring (keeping the loose thread in between) and tie up the ring. 


2nd round: Single crochet 2 into each of the 4 stitches around the ring which makes 8 stitches.
3rd round: Single crochet 2 into every second stitch (one into every other stitch) which makes 12 stitches.
4th round: Single crochet 2 into every third stitch (one into the other stitches) which makes 16 stitches. 
5th round: Single crochet one whole round (16 stitches). 


6th round: Single crochet 2 in every fourth stitch (one into the other stitches) which makes 20 stitches.
7th to 10th round: Single crochet (20 stitches each round) until your egg cosy is long enough (mine was long enough after 4 rounds).
Slip stitch one (into the first stitch of the round) cut the thread and pull it through the slip stitch. Weave in the ends with the tapestry needle. 
Always count stitches while crocheting that the edge becomes straight. Turn your cosy inside out if this hasn't already happened while working (it always happens when I'm making it).

So now you've already got a nice egg cosy but as it is Easter our cosy should become a bunny and we have to make some ears. Here's how I've made those:
Chain 8, then single crochet 6 (you normally leave 2 out when turning). Be careful to use only the backloops for the sc as you can see in the left picture below. Chain one at the end of the sc row (middle picture). Then turn the piece NOT from front to backside as you're used to BUT UPSIDE DOWN (see the right picture).
Now it comes to the difficult part: Crochet together the 2 rows you've just made. You have to put your needle through both stitches (from the second and first row) and through both loops from each row (4 loops in total) and then single crochet. Do this with all 6 stitches and it will look like shown in the right picture below (from the front) and the middle picture (from the back). 
Don't worry if you can't get all 4 loops on your hook for some stitches (especially the last one can get hard) you won't see it afterwards.


Add to more single crochets on the left end (still looking at the piece from the front). The whole where to put them is in the middle – don't worry, you'll find it (see the left picture below).

Turn the piece upside down again. Now there are holes on this side too. Slip stitch into these holes until you come to the left end of the piece (it should be 5 slip stitches). Then cut you thread and pull it through as shown in the right picture. Work the second ear equally.


Once you've finished the ears, just sew them onto the egg cosy with the lose threads and weave in all threads with the tapestry needle. If you like, you can add a face (though they already look nice without I think).


Now I hope, you enjoy crocheting easter bunny egg cosies. Please let me now what you think of my tutorial, if it's easy to understand and feel free to ask questions if anything's not clear. 

I'm gonna make some more bunnies now (I already made some) in different colours, so we can have a very colourful breakfast table at Easter!

Monday, 31 March 2014

Project #8: Quilling Easter Eggs

With Easter coming up, I figured it might be time for some preparations. I bought this kit for quilling Easter Eggs plus a quilling tool some weeks ago. It's from Karen-Marie, where you can by lots of different seasonal quilling kits (I got mine from a German catalogue though). I never did much quilling before, but it didn't turn out to be that difficult, you just have to be a little patient.
I gave those five eggs to my grandma for her birthday. I put threads on them so she can put them up on the window or on some branches. She really liked them.
...so I'll have to make new ones soon, for my own Easter decoration :)


Wednesday, 12 March 2014

Project #7: Pompom Hair Pins

Good Morning everyone,
I've been up early, it's great spring weather and the steam of my tea is coming up in the sunlight. So I thought you might like a new project :)

How about these pompom hairpins? The white one - I have to admit - was already made in winter. I think it looks like a little snowball. So that's probably not the best to wear right now. But the colourful one looks a lot like spring or summer to me.

They are really easy to make. I used the tutorial on Ordinary Mommy Design. Ever since I discovered it, I've wanted to give it a try. And I love them because it's really a fast and easy way to pimp your outfit with a customised accessory (plus you can use yarn left overs!). I think I'm gonna make more of them in different colours...

I used the smallest ring of these pompom makers. On the colourful one, I left a longer thread when tying up. So the thread is hanging down in my hair like a strand.


Doesn't it look like a spring flower? Now that I look at it I guess you could take the white one as flower too...


Wednesday, 5 March 2014

Project #6: Back loop only slip stitch

This week I practised new crochet stitches. When I discovered this pattern for fingerless gloves by Tanja Osswald, I had to have it. As I don't know that much about crochet I followed the advice to practise slip stitches, especially back loop only. I used different videos and tutorials, e. g. this one.
It's really not that easy. As you can see in the picture, the edge isn't always straight, I tried crocheting the edge with (lower rows) and without (upper rows) chain stitches and by now I prefer adding a chain stitch when turning the piece.
However I think I got a pretty good hang of using back loop only chain stitches and will start on the pattern very soon. I'll show you if it's working out...

Tuesday, 25 February 2014

Project #5: Tricot yarn crochet basket

This is project #5. I told you I would try to get more into crochet. I've always wanted to try working with tricot yarn. When discovering it at a Panduro shop (I love Panduro!!!) with even free patterns, it got me and I instantly bought a ball of this yarn in a really nice colour. This basket was really easy to make, even for crochet beginners. You find several patterns and the so-called zpagetti yarn at the Panduro online shop.

Here is what it looked like at the beginning...


...now I'm using it to place
my current knitting stuff
nicely under my coffee table.
Have a great week!